HACC Gen Extender Documentation
| Site: | HACC Gen |
| Course: | HACC Gen |
| Book: | HACC Gen Extender Documentation |
| Printed by: | |
| Date: | Saturday, 20 June 2026, 1:42 AM |
1. Overview
Haccgen Extender is a plugin for the Moodle Tiny Editor that adds AI-powered tools directly into the editor toolbar. Teachers, content authors, and course designers can generate summaries, translations, audio narrations, images, infographics, avatar videos, and more — without ever leaving the editor.
This manual covers everything you need to get started: how to use each tool, what every field means, how admins configure the plugin, and how to fix common errors.
2. Who is this for?
Teachers and content authors who want AI-assisted writing, translation, audio, and image generation inside Tiny Editor.
2.1. Prerequisites
• Moodle with Tiny Editor enabled
• tiny_haccgen_extender plugin installed
• Admin has configured: Endpoint URL, Subscription Manager API key, and API secret
• Your user role has the capability tiny/haccgen_extender:use
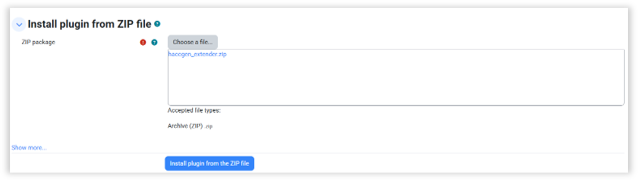
3. Installation
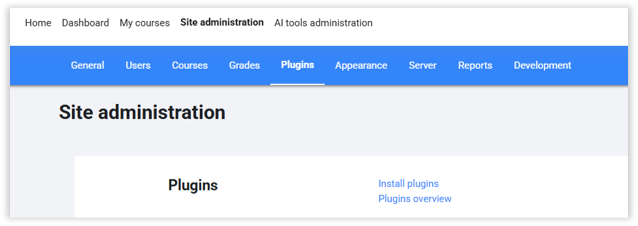
1. Navigate to Site administration → Plugins
2. Click on “Install Plugins”
3. Add the “local_haccgen_extender” plugin zip.
4. Follow Moodle Instructions and Install the plugin.
Acquire Credentials.
Visit https://haccgen.com/ and do the necessary to acquire credentials.
Add credentials to the Settings page.
Navigate to:
Site administration > Plugins > Haccgen Extender

Permissions:
If you want all the userto have access to HACC Gen Extender, the allow following permission for Authenticated User:
tiny/haccgen_extender:use - Allow
You can also create a Site Level Role like "HACC Gen Extender Access" and allow this permission to that role only. Then all the users with this role will have access to HACC Gen Extender.
4. Quick Start (5 Minutes)
1. Open any activity or resource that uses Tiny Editor.
2. (Optional but recommended) Select text in the editor before clicking Haccgen Extender — this pre-fills the prompt field in most tools.

3. Click the Haccgen Extender button in the editor toolbar (sparkle/AI icon labelled "Haccgen Extender").

4. Choose a tool from the Haccgen Extender tools gallery.
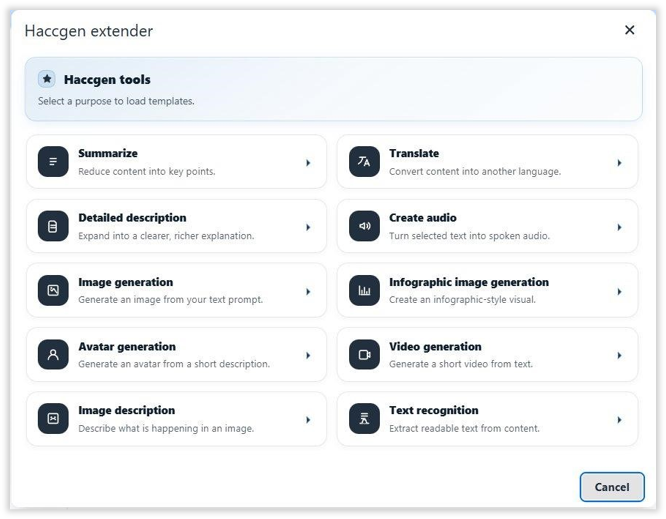
5. Fill in the required fields, then click Run.
6. In the result dialog, choose Copy, Insert below, or Replace selection.
Admin Setup Guide
Path: Site administration → Plugins → Text editors → Tiny editor → Haccgen extender
4.1. Settings Page — Endpoint & Credentials

Figure 3: Admin settings page showing Endpoint URL, API key, API secret, and usage summary
4.2. Endpoint URL
• Field label: Endpoint URL
• Internal key: tiny_haccgen_extender | endpointurl
• Required: Yes
• Default: Empty
• Purpose: The upstream AI endpoint that handles all plugin requests.
• Example: https://haccgen.com/.../local/subscription_manager/ai_endpoint.php
⚠️ Warning: No tools will work if this field is empty. Always configure this first.
4.3. Subscription Manager API Key
• Field label: Subscription Manager API key
• Internal key: tiny_haccgen_extender | subscription_api_key
• Required: Yes (when using Subscription Manager AI endpoint)
• Purpose: Identifies your LMS subscription with the AI service provider.
• Where to get it: Generate from the HACCGEN dashboard (same as the main Haccgen plugin).
4.4. Subscription Manager API Secret
• Field label: Subscription Manager API secret
• Internal key: tiny_haccgen_extender | subscription_api_secret
• Required: Yes (when using Subscription Manager AI endpoint)
• Purpose: Authentication secret paired with the API key. Stored as a password field.
4.5. Subscription Usage Summary
The settings page displays a live usage table showing how much of each resource your site has consumed versus the plan limit. These figures are shared across all users on this Moodle site — they are not per-user limits.
|
Resource Type |
Example Used |
Example Limit |
|
Words (text AI) |
0 |
500 |
|
Audio (seconds) |
0 |
300 |
|
Images |
1 |
5 |
|
Video (seconds) |
0 |
60 |
4.6. Timeout & Allowed Purposes
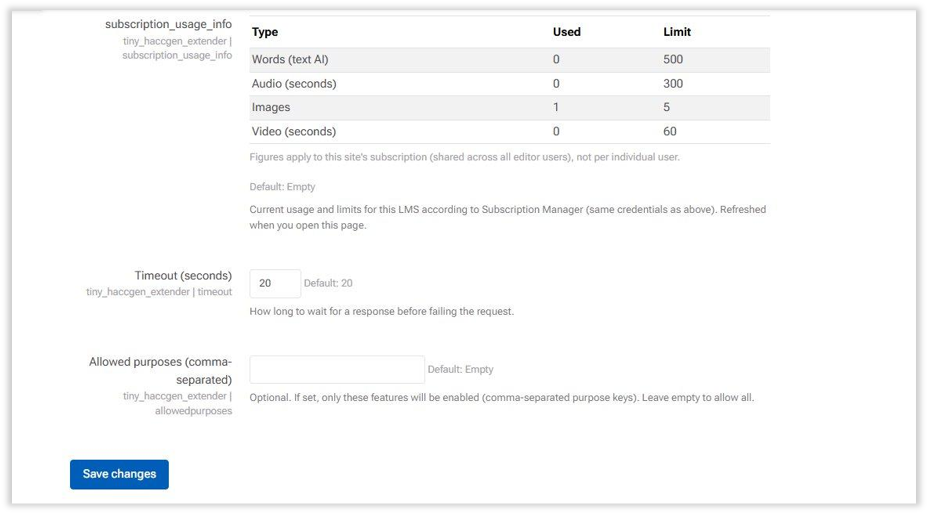
Figure 4: Lower settings section — Timeout (seconds) and Allowed purposes fields
4.7. Timeout (seconds)
• Internal key: tiny_haccgen_extender | timeout
• Default: 20
• Type: Integer
• Purpose: How many seconds to wait for a response before failing the request.
💡 Tip: Video generation takes significantly longer than text tools. The plugin handles video timeouts internally, but if you see timeouts on other tools, try increasing this value to 30–60.
5. Tool Catalog
The following tools are available in the Haccgen tools gallery. Each section explains what the tool does, what fields to fill in, and how to get the best results.
|
Purpose Key |
Tool Name |
Output Type |
|
summarize |
Summarize |
Text |
|
translate |
Translate |
Text |
|
detailed_description |
Detailed description |
Text |
|
create_audio |
Create audio |
Audio file |
|
image_generation |
Image generation |
Image |
|
infograph_image_generation |
Infographic image generation |
Image |
|
avatar_generation |
Avatar generation |
Video |
|
video_generation |
Video generation |
Video |
|
image_description |
Image description |
Text |
|
text_recognition |
Text recognition (OCR) |
Text |
5.1. Summarize
Reduces long text into concise key points. Ideal for condensing lecture notes, articles, or lengthy instructions.
|
Field |
Type |
Default |
Allowed Values |
|
Maximum amount of words |
Select |
nolimit |
nolimit, 10, 20, 50, 100, 200, 300, 400, 500 |
|
Language type |
Select |
keep |
keep, simple, technical |
|
Prompt |
Textarea |
Selected text |
Any text — required |
💡 Tip: Select your text before opening the tool — the prompt will be pre-filled automatically.
⚠️ Warning: Do not set a very low word count (e.g. 10) for complex or lengthy input — the summary will be incomplete.
5.2. Translate
Converts selected text into a chosen target language. Useful for creating multilingual course content.
|
Field |
Type |
Default |
Notes |
|
Target language |
Select |
English |
Includes English, Arabic, Hindi, Spanish, and more |
|
Prompt edit mode |
Textarea |
Selected text |
Required. Paste or select source text |
5.3. Detailed Description
Expands text into a richer, clearer explanation. Good for elaborating on concepts or making instructions more accessible.
|
Field |
Type |
Default |
Allowed Values |
|
Maximum amount of words |
Select |
nolimit |
nolimit, 10, 20, 50 |
|
Language type |
Select |
keep |
keep, simple, technical |
|
Prompt edit mode |
Textarea |
Selected text |
Required |
5.4. Create Audio
Converts text into spoken narration audio. The generated audio file can be inserted directly into the editor.
|
Field |
Type |
Default |
Notes |
|
Target language |
Select |
English (en-AU) |
Locale list: English (en-US), Hindi (hi-IN), etc. |
|
Gender |
Select |
Male |
Male or Female |
|
Prompt edit mode |
Textarea |
Selected text |
Required — the script to narrate |
5.5. Image Generation
Generates a static image from your text prompt. Supports multiple aspect ratios and resolutions.
|
Field |
Type |
Default |
Allowed Values |
|
Prompt |
Textarea |
Empty or selected text |
Required — describe the image |
|
Size |
Select |
1:1_1024x1024 |
1:1_1024x1024, 4:3_896x1280, 4:3_1280x896, 9:16_768x1408, 16:9_1408x768 |
5.6. Infographic Image Generation
Creates infographic-style visual output — ideal for data summaries, process diagrams, and visual aids.
|
Field |
Type |
Default |
Allowed Values |
|
Size |
Select |
1:1 (1024 x 1024) |
1:1, 4:3 (896x1280), 4:3 (1280x896), 9:16 (768x1408), 16:9 (1408x768) |
|
Density |
Select |
medium |
medium, high |
|
Prompt |
Textarea |
Empty or selected |
Required — describe the infographic |
5.7. Avatar Generation
Generates a talking avatar video from a script. Options are loaded dynamically from the backend.
|
Field |
Type |
Default |
Notes |
|
Script (Prompt) |
Textarea |
Selected text |
Required — the spoken script |
|
Avatar Id |
Select (dynamic) |
First available |
Options loaded from backend |
|
Voice Id |
Select (dynamic) |
First available |
Options loaded from backend |
|
Video Style Id |
Select (dynamic) |
First available / "normal" |
Options loaded from backend |
|
Output Format |
Select (dynamic) |
First available / mp4 |
Options loaded from backend |
|
Resolution |
Select (dynamic) |
First available / 1280x720 |
Options loaded from backend |
5.8. Video Generation
|
Field |
Type |
Default |
Notes |
|
Prompt |
Textarea |
Empty or selected |
Required — describe the video |
|
Language |
Select (dynamic) |
First / "English" |
Options loaded from backend |
|
Voice |
Select (dynamic) |
First available |
e.g. "Matilda" |
|
Aspect ratio |
Select (dynamic) |
First / "16:9" |
e.g. 16:9 (Landscape) |
|
Output format |
Select (dynamic) |
First / "MP4" |
e.g. MP4 |
|
Font |
Select (dynamic) |
First available |
e.g. ABeeZee |
|
Use generative image |
Select |
Yes (true) |
Yes/No |
💡 Tip: Video generation takes significantly longer than other tools. Do not navigate away from the editor while it processes.
5.9. Image Description
Describes the contents of an uploaded image. Upload an image and provide an instruction prompt.
|
Field |
Type |
Default |
Notes |
|
Image upload |
File (drag/drop or picker) |
None (required) |
Accepts PNG, JPG, JPEG, WEBP |
|
Prompt |
Textarea |
Empty |
Required — e.g. "Describe this chart in detail." |
⚠️ Warning: If you click Run without uploading an image, the plugin will show: "Please upload an image first."
5.10. Text Recognition (OCR)
Extracts readable text from an uploaded image. Useful for digitising scanned documents, whiteboards, or image-based PDFs.
|
Field |
Type |
Default |
Notes |
|
Image upload |
File (drag/drop or picker) |
None (required) |
Accepts PNG, JPG, JPEG, WEBP |
|
Prompt |
Textarea |
Extract all readable text from this file. Preserve line breaks. Output only the extracted text. |
Editable — adjust to fit your needs |
6. Result Dialog Guide
After clicking Run, a result dialog appears showing the generated content. The available actions depend on the output type.
6.1. Text Results
• Close — dismiss the dialog without inserting anything.
• Copy — copy the result text to your clipboard.
• Insert below — add the result as a new paragraph below the current cursor position.
• Replace selection — replace the originally selected text with the result. Only shown if you had text selected before opening the tool.
6.2. Media Results (Audio, Image, Video)
• Close — dismiss without inserting.
• Insert below — insert the generated media element below the cursor. Available when the media is prepared successfully.
• Replace selection — replace selected content with the media. Shown only if there was a prior selection and media can be inserted.
6.3. Media Localization
When inserting media, the plugin attempts to save the file to Moodle's draft file area so that the link remains durable. If the draft area is unavailable, the plugin may fall back to an external link or display a warning.
7. Best Practices
• Always select source text before opening a text tool — it pre-fills the prompt and saves time.
• Keep prompts specific: include the topic, desired style, and expected output format.
• For images and videos, describe the visual style, subject matter, and intended use.
• Validate AI-generated content before publishing it to learners.
• Admins: use allowedpurposes to restrict high-cost tools (video_generation, avatar_generation) during pilot rollouts.
• Admins: review the subscription usage table regularly to avoid hitting plan limits.
• For large video or audio tasks, run them during off-peak hours to avoid timeout issues.
8. Complete Field Reference
Admin Setting
|
UI Label |
Internal Key |
Required |
Default |
Notes |
|
Endpoint URL |
endpointurl |
Yes |
Empty |
Valid URL/path to AI endpoint |
|
Subscription Manager API key |
subscription_api_key |
Conditional |
Empty |
Required for Subscription Manager endpoint |
|
Subscription Manager API secret |
subscription_api_secret |
Conditional |
Empty |
Required for Subscription Manager endpoint |
|
Timeout (seconds) |
timeout |
No |
20 |
Integer; video uses internal extended timeout |
|
Allowed purposes |
allowedpurposes |
No |
Empty |
Comma-separated purpose keys; empty = all allowed |
9. Changelog
- 2026.02.17
- Image size selection (Landscape & Portrait)
- Avatar Gallery for avatar video creation
- Fixed Text Recognition drag-and-drop upload
- Fixed Image Description drag-and-drop upload
- UI and workflow improvements